MR DOMESTIC’S AURA BLOG PARTY

I’ve been the world’s worst blogger, haven’t I?  The thing is, life just got so busy.  Increasingly, Instagram’s speed and snappiness makes it my platform of choice for keeping you all up-to-date with the attic’s goings-on.  Now, I’m not going to spend all this post apologising for what I haven’t been writing, but rather get to sharing the cool thing that I came here to share with you all.  So let’s move on…but, I am going to try to blog a bit more, maybe even attempt a site update…watch this space.  Anyway, tah-dah!

thumbnail_Aura Blog Party Square Banner (1)

A few months back, Matthew, AKA the insanely talented Mister Domestic, invited me to be part on his blog party for his latest fabric collection for Art Gallery Fabrics, Aura.  I’ve been following Matthew for a long time, so I knew that whatever had his name on it was sure to be something that I wanted to be involved in.  His work is amazing and his colour palette make my eyes smile.  This collection was inspired by a trip to Hawaii that Matthew took with his daughter.  I couldn’t wait to get started!

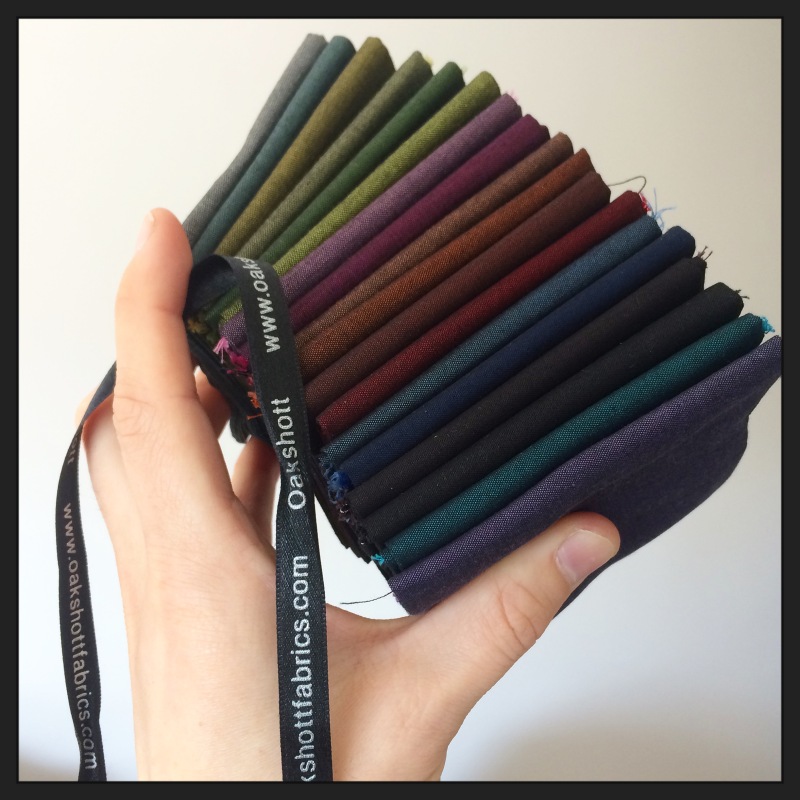
The fist thing was to curate the fabric I was going to use for my project.  I picked all my favourite prints from the collection before mixing in some Art Gallery Pure Elements.  Those colours are so rich and saturated that the task was not an easy one!  I also had some oddments of Art Gallery denim which I threw into the mix.  Aren’t they pretty all hanging out together?

IMG_0810

DFD28BE0-E357-4A49-89E3-2744827DBE13

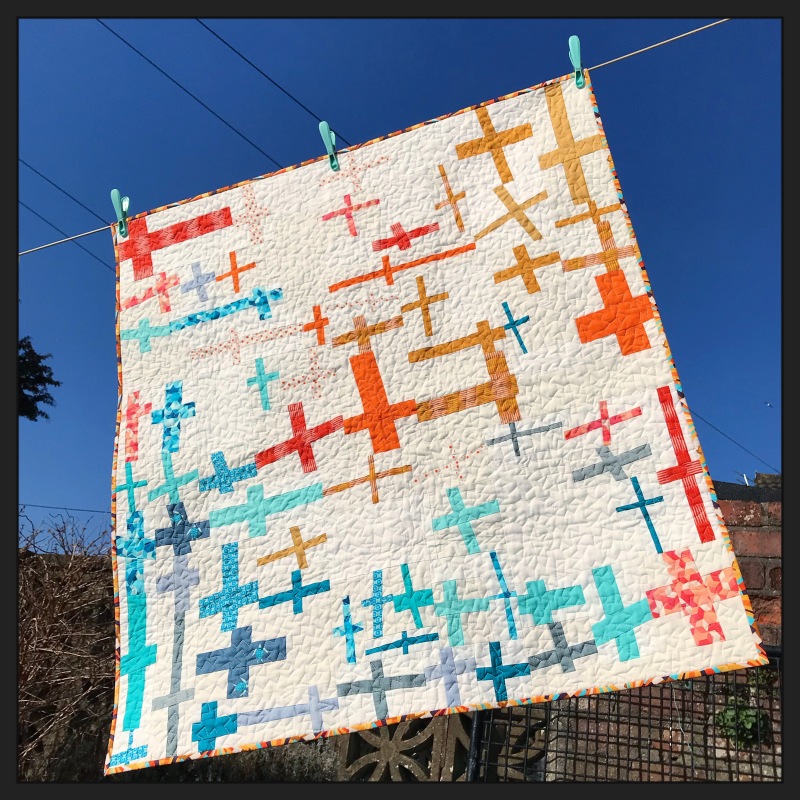
It was obvious I was going to make something using improvised techniques, so I settled on an old favourite, a wonky cross quilt, to really make the colours and prints sing.  This type of block is great for getting into a rhythm and loosing yourself in the piecing.  I’ve made quite a few of this type of quilt and never bore of the process.  Here’s what the blocks looked like as I played with the layout.  Again, this arranging and putting together of the quilt jigsaw is so enjoyable.

E879577A-57B3-48C2-89A1-67D45C3ACA17

Piecing the top was a quick process.  I used my go-to Aurifil thread for joining and quilting, favouring an all over zigzag that’s becoming quite at home in my free motion repertoire. The quilt is approximately 35″ square and I intend to pass it onto to my latest nephew, born at the start of the year.  I can’t wait to get some photographs of him chilling out on it!  Luckily, on the day I came to photograph the finished quilt for this post, the sun was shining and we had one of the bluest skys I think I’ve ever seen in Wales.  It must have been that Hawaiian vibe rubbing off!

2CA847B3-F8F2-41F7-8652-69F68E98376D

Thank you Matthew for asking me to be a part of celebrating this great collection.  Be sure to check out all the other amazing makers that are part of this party.  There are some thirty-odd projects to look out for, so plenty to inspire you all.  Thanks for stopping by.


GEOGRAM BLOG HOP

Hello! I know, I know! We’re not even going to mention it. I’m working on getting better, so for now let’s move swiftly on and look at some lovely fabric, yes?

img_5313

To followers new and old (who are also very, very patient), welcome to my day on Lecien Fabric’s Geogram Bloh Hop. I’m so excited to share with you all the fun I’ve been having with this new and exciting collection. But first, a confession. I only have a WIP. I started with all the best intentions and yes, whilst I did leave it to the eleventh hour, I still had every faith that I would get the project done on time…and I would have, had it not evolved so dramatically. You see, this new collection from Samarra Khaja is so inspiring, my original idea grew wings and soared to new heights. So that’s my confession, straight out the gate.

A little about the fabric. As I mentioned, Geogram is designed by very talented Samarra Khaja. It has 30 SKUs and a variety of precuts and will be in stores this month. It’s currently sold in the U.S., Europe and Australia and will be released in Japan in the spring. Plus it’s awesome!

IMG_3479.JPG

The colours! Oh, the colours!

For my project, I wanted to make something that would show case the whole collection in all its rainbow-y goodness. I knew that whatever I ended up making, the fabrics would have to appear in a full colour spectrum, that way their true awesomeness could be appreciated. I also knew that I wanted to pair them with a neutral, something with a bit of texture too.

As you may have noticed from IG, I’ve been enamoured with wonky cross blocks of late, having developed a streamlined process for their quick and easy construction. What better way to showcase this collection than with a field of wonky crosses! I got to making them and then realised I couldn’t stop. The project grew and grew, from the small mini quilt I originally envisioned, to the current quilt top I have waiting to be basted.

IMG_5154.JPG

I loved the process, particularly filling in the background with various yard dyed linens. Making an improv quilt like this, where you’re never quite sure what size your blocks or even the quilt top will end up, is so liberating. I throughly enjoyed doing this giant jigsaw and you can see that the quilt evolved through several stages before I was happy with it.

IMG_5314.JPG

As always, the casualty of such construction is the sewing room, which looks like my fabric stash threw a frat party in there! I’m taking a day off before I tackle the mess and get basting! Be sure to pop back and see the finished quilt. Also, keep a look out for a little scrap giveaway on IG very soon!

img_5312

For more projects using Geogram, be sure to check out all the other stops along the way. A full list can be found on Lecien’s IG account. On a final note, the selvedges of the collection read “make stuff and be nice”. What a lovely anecdote for the times we know find ourselves in.

Thanks for visiting!

THE PROCESS

Remember the wonky cross blocks I was making every now and then, when other quilts and tight deadlines weren’t pulling me every which way? Well, as some of you may know, I finished making the top. There was a happy coincidence actually, in that the particular day marked exactly one year from when I made the first block. It was completely unintentional and a nice way to mark the occasion.

image

As I write this, the quilt is having some magic added to it by Trudi Wood, quilter extraordinaire! I’ve actually entered it into this year’s Festival of Quilts, along with one other, and is the first time I’ve had an entry in a competition. I wouldn’t normally enter, but something about this quilt pushed me to.

image.jpeg

I’m not ashamed to say I love this quilt, even though it’s not finished and I’m having a nightmare deciding on a binding fabric! Though perhaps what I love even more is the process behind it, the small steps to make the cross blocks, sometimes 2 or 3, sometimes a whole stack; in the morning, or at night whilst the house sleeps, I’ve never been so engaged with a project as I was when I sewed this one. I’m so excited to get it back and add the finishing touches, if only to allow myself to start another!

However prolific a maker you are, enjoy the process. Take time to savour the stitches and be rewarded all the more at the end of it. I know I was. Now, back to that bloody binding…


CRAFTING THANKS

Many of you may have heard me refer to my ‘American mum’ on my various social media platforms. Debi Pedersen is the real-life mum of Stacey, a very dear friend of mine, and somebody who I’ve grown close to in the 8 years I’ve known her.  She and her husband Jim were kind enough to put us up when my partner and I embarked on a tour of California with Stacey, back in 2008.  We had such a great time and vowed that we would keep in touch.  In the years that followed, we’ve met up in London and they have stayed with us here in Cardiff when they visited to celebrate Stacey’s 30th birthday. They really are awesome people and have done so much to support my growth as a quilter that it was only natural I’d want to repay them in the best way I know how.

image.jpeg

Now, I’ve been known to use the Pedersen’s residence as my own personal post office. If I make a purchase or partake in a de-stash and the seller won’t ship internationally then Debi kindly let’s me have fabric and other notions sent to her for storage.  I’ve lost count of the times that I’ve done this and I inevitably end up with a towering pile of purchases waiting to be collected. I always envisage that one day I’d return to CA and collect it all, but more often than not Debi surprises me and has it posted out.  So thoughtful!  On one of these occasions she included in the package some blueberry-themed fabric she had picked up for herself at a local store, asking if I might be able to make something for her with it. Shamefully, that was about 2 years ago.  Life got in the way and the fabric fell ever-deeper into the stash.  It took a house move and a load of unpacking for it to resurface and prompt me to get a move on. The heart of Debi’s house is her kitchen.  Both her and Jim and amazing cooks and she has such a passion for all things culinary. With that in mind, I decided that a table runner, rather than a quilt, would make for a more fitting gift. Refusing to keep her waiting any longer, I liased with Stacey to get some secret table measurements and set about making!

image

The resulting runner makes me smile, not only because I know it’s going to a deserving person, but also beacuse I had such fun making it. As always, I indulged in the fabric pull. Using the blueberry fabrics that Debi had sent as my inspiration, I mixed them with some stash favourites, including some new L’s Modern Garden by Lecien, various Carolyn Friedlander prints and some coordinating Kona solids. The background is Essex linen in steel. I kept the construction simple, making a load of stitch and flip blocks before trimming them down to squares using my trusty Sizzix Big Shot.  Then it was a case of arranging them into a long lightening bolt shape and sewing them all together.  For the quilting, wavy organic lines compliment the angular piecing. I used Aurfil 50wt against an amazing First of Infinity print for the backing.  It had been waiting patiently in the stash for its moment to shine and I think that it has found it! With a text print from the Architextures collection, the runner was done.

image.jpeg

In the weeks since completion, the runner has crossed the Atlantic and arrived safely in the States. I’m pleased to report that Debi and Jim love it and I’m so glad that I’ve finally been able to thank them both in some small way.  I love that a small piece of me is in their home and their hearts and hope that they’ll continue to love and use it for genrations to come.

image

image

image

Thank you guys!

THE BUSINESS OF BLADES

Whatever I do, I’m all about quality. Making a cake? Use the best ingredients. Need a new pair of jeans? Invest in more expensive ones and they’ll reward you in the long run. My mantra is no different when it comes to my quilting. I love the feel and weight of really good fabrics. I love the knowledge that my thread isn’t going to snap every five minutes because it didn’t cost 50p. When I first began quilting, rather than rush out and buy everything, I took the time to curate a collection of quality tools that I knew would not only do the job, but do it well.

image.jpeg

I mentioned in a recent episode of Quilt  Monkey that us quilters are so often blinded by all the pretty fabrics that we sometimes forget about the things that makes using those fabrics easier, namely our sewing machine needles and our rotary cutter blades. To change either of these after becoming accustom to their dull and blunt predecessors is a simple pleasure that many of us of forget about. Yet such an act can make all the difference to the quality and accuracy of our sewing.

Now, I know some of you will be like me, wanting nothing more than to take what we spend on these things and buy yet more fabric. I hate the fact that blades are marked up so much here compared to in the US, where everything seems cheaper. Yet, with that little voice of quality whispering in my ear, I was sure to buy only the branded blades for my cutter, thinking anything else would be substandard and uneconomical. Well, how wrong I was!

image

A few days ago I received some blades from the lovely people at Barnyarns. I’d purchased items from them before and was pleased to see they’d arrived on Instagram. What piqued my interest was a post about the range of unbranded blades they now stocked. I read that the blades were made of quality steel and fit most of the top brands, like Olfa, and many different models. I was intrigued.

The blades arrived, were promptly tested and I can say that I’m throughly impressed. I received the 45mm size, but these replacements are also available in 60mm. They come in pairs, housed in a small plastic case for safety and ease of transport. You’d think that a lower priced product would do away with things like that, but just like their more expensive counterparts, these are nicely packaged and perfect for storing your dull blades for disposal.

image.jpeg

As for the business of cutting, I’d never know I wasn’t using a branded blade. The cliché  of ‘a hot knife through butter’ seems obvious, but the cuts were so beautifully clean I can’t help but use it. I was layering fabric and the blades had no trouble slicing through 5 layers; they probably could have handled more!

image.jpeg

I’m so pleased that these blades changed my mind about unbranded notions for my quilting. Of course, there are some things I won’t change, but the savings available on what is a top quality product makes these my blades of choice for the foreseeable future. Thanks Barnyarns!

Do you need to change your blade? Do yourself and your cutter a favour and try these out. Head over to my Instagram where I’m giving away 5 pairs of 45mm blades to some lucky people. Then you can let me know what you think!

Thanks for visiting!

OAKSHOTT LIPARI BLOG HOP

Welcome to the second stop on the Oakshott Lipari Blog Hop. Now, before we begin, I have a little confession to make. I am a huge Oakshott fan! I remember seeing some way back when and dying at the sight. You know when people say “oh, you really have to see it to believe it”, well, nothing could be truer with these stunning fabrics. They beg to be viewed up close. My stash now has a whole shelf of them and even a separate box for all the scraps and off-cuts. Hoard them I do, so it was a no brainer when Lynne asked if I’d like to be part of a blog hop celebrating the latest collection.

image.jpeg

Each of the eighteen colours of the Lipari collection are woven with black thread to give a dark and rich palette. I was reminded of a Moroccan souk by the deep jewel colours and my mind was awash with exotic things I wanted to make! They’re 54″ wide too, so they go that little bit extra and are perfect for garment making.

After much thought and lots of fabric petting, I decided upon a paper pieced quilt block I’d had in my mind for quite a while. I think I’m right in saying that the inspiration came from a plant pot I saw in a Buzzfeed article about the ten coolest things you can buy your plants. Slightly odd, but inspirational none the less! I’ve called this the ‘Prism Plant Pot’ block.

image

It’s always so much fun to draft a paper pieced pattern. At the start, there’s the worry about whether it’ll all come together and actually look like it does in your head. After a few initial sketches, I had the design nailed and was thankful that a friend was able to digitise it for me. I’m more of a pencil and graph paper sort of guy, which, although fine for me, wouldn’t work too well when it came to sharing the pattern. After a quick test block, I was ready to go!

image

Owing to time restraints, I settled on a mini quilt for this make, although, by using chain piecing, the blocks came together so quickly that a full quilt wouldn’t have taken that much longer. I decided to pre-cut the fabric to size beforehand for this project, the first time I’ve done so. I was so surprised at how much quicker the whole thing came together and before I knew it I was ready to quilt. Oakshott cottons take quilting beautifully, though it took me an age to decided on a design.

image.jpeg

What at first was something I didn’t look forward to, quilting has become one of my favourite parts of quilt making. I guess it’s a confidence thing. Early on, I would see beautifully quilted quilts with intricate designs and wish that I could do them. With every new quilt I make, I’m excited and willing to try something new and push the limitations of my skill, slowly but surely building up my repertoire.

image.jpeg

For this mini, after discarding several ideas, I went with a meandering angular line that was so much fun to quilt as I tuned in to an episode of one of my favourite podcasts. If you find yourself tensing up when you attempt FMQ, then listening to some music or a podcast is a great way of finding some flow. The binding was simple, and chosen to blend in to the quilt top. You all know that binding is my favourite part and I so relish the moments of hand sewing with dog at feet and some old vinyl crackling away in the background. Bliss!

This fabric, like all the other Oakshott I’ve had the pleasure of working with, really is a dream to sew. Yet it’s the colours that get me every single time. I’m so excited to see what they come up with next!

Should you want to make your own Prism Plant Pot mini, you’ll find a small tutorial below. I won’t go into the ins and outs of paper piecing here as there are plenty of great write ups on the subject already. If you’ve never tried, this pattern is a really easy one, though you may want to do a few test blocks using fabric that isn’t your best.

To to make a mini like mine, which finishes at approx. 22″ x 26.5 you’ll need to make 16 blocks, which will be sewn into a 4 x 4 layout. Start by printing out 16 copies of Prism Plant Pot template 1 and 16 of Prism Plant Pot template 2 These will be paired up to make one finished block.

To make the quilt, use the following fabric quantities as a guide, though remember that with paper piecing, everyone has a different level of comfort, that’s to say, you may need more wiggle room than the next person! I’ve listed the colours I used too.

For the prisms – fat eighth pack of Liparis (with lots left over!)

For the background, backing and binding – 2 meters of Liparis Milazzo

For the side pieces – 0.4 meters of Liparis Pollara

For the top fabric – 0.25 meters of Scandinavia Uppsala.

If like me you want to do all the cutting beforehand, then use these following measurements to prepare all your pieces to make 16 blocks.

From the prism fabric (I used all the colours in the bundle except the Milazzo and Pollara as these were used elsewhere) – 32 3.5″ x 4″ pieces, 2 of each remaining colour. These will be section 2 on the pattern.

From the background fabric – 32 3.5″ x 2″ pieces for section 1, 32 3.5″ x 2.5″ pieces for section 5 and 32 6.5″ x 1.5″ pieces for section 6.

From the side fabric – 32 3.5″ x 4″ pieces for section 3.

From the top fabric – 32 3.5″ x 1″ pieces for section 4.

Piece all 32 block halves before matching them in pairs and joining together to make 16 finished blocks. Take care to align each half so that the prism is as neat as possible. Arrange the block in 4 rows of 4, distributing the colours. Sew the blocks into rows before joining the rows together to complete the quilt top.

From your remaining Milazzo fabric, cut your backing and your biding strips (you’ll need 2 at the full WOF. I cut mine to 2″ but if you prefer you can cut to 2.25″). Baste with batting using your preferred method and quilt the top before making and attaching the binding.

Job done!

Thank you for stopping by today. If you’ve liked what you’ve seen, be sure to take a look at all the other stops on the tour, which you’ll find listed below. To keep up to date with all the goings on from the attic, follow along by signing up in the task bar and following over on Instagram where I post as quiltsfromtheattic. If you make a Prism Plant Pot block, let me know using #prismplantpotblock.

Happy sewing!

5 May     Allison Dutton       allison-sews.blogspot.com

10 May   Nicholas Ball         quiltsfromtheattic.wordpress.com 

12 May   Helen Purvis          archiethewonderdog.blogspot.com

17 May   Lynn Harris            thelittleredhen.typepad.com

19 May   Kitty Wilkin           nightquilter.com

24 May   Jessica Skultety      www.quiltyhabit.com 

26 May   Karin Jordan           www.leighlaurelstudios.com

31 May   Elisabeth Vaughan  sharksdinner.com

SIMPLY SOLIDS BLOGGER BUNDLE

A few months ago, the lovely ladies at Simply Solids, a great fabric store in Huddersfield, asked me if I’d be interested in curating a bundle for a new stash club they were rolling out. The ‘Blogger’s Choice’ bundle is made up of fabrics chosen by bloggers and quilts designers, and once the first three names were announced, it was clear that I was in awesome company. After Karen Lewis and Nicole Dakiewicz selected their fabrics, it was my turn. I thought about it for weeks beforehand and am now so excited to say that my month is live and flying through the postal system to land in the stashes of subscribers.

image.jpeg

As you may know, pulling fabrics is one of my favourite parts of quilt making. I went for a palette of rich blacks, hot pinks, earthy browns and a splashes of gold. I took the jumble print from Carkai by Carolyn Friedlander as my starting point and added some Handcrafted by Alison Glass, as well as some great blenders like the modern batik print by Me and You for Hoffmann Fabrics. I also couldn’t resist throwing in some Essex yarn dyed from Robert Kauffman for texture.

I received my bundle yesterday and it looks SO good in person! I think I may have outdone myself.  The metallic painter’s canvas has to be seen in real life. It’s just gorgeous!

There’s still time to sign up to the stash club and receive my bundle. Other bloggers will be announced over the coming weeks. For all the information you need to subscribe, visit simply solids here.

Thanks for dropping by!

QUICK AND EASY QUILTS

When I first started out on my quilting journey I sent an email to Lynne of Lily’s Quilts, asking for advice about how to start a blog. I really admired her work and thought she’d have great brains to pick. Thinking back, the email was probably cringe worthy to say the least, but Lynne was kind enough to respond and give me some great pointers. I remember being so excited. It was like I was talking to quilting royalty and had been invited to join this crazy, fun world of quilting

When I was asked to take a look at Lynne’s new book, Quick & Easy Quilts, I jumped at the chance. As some of you may know, I’m a bit of a bibliophile and getting my hands on a crisp, new book is almost as good as fabric deliveries! When the book is about fabric, then I’m winning.

image

Published by Kyle Books with bright and cheerful photography by Jan Baldwin, it’s the kind of quilting book you can’t help but smile at as you flick through. I have to confess that I loved it even before I opened it. The cover is beautifully tactile; embossed, with a sheen across that title that begs to be stroked. I know what you’re thinking and you’re right; I’m mad, but you’ll understand what I mean if you get a copy.

image.jpeg

I was pleased to see that despite the title, many of the projects look decisively more difficult than Lynne’s clear and concise instructions make them. The Supernova is a stunning, impactful project that looks like it would take you weeks, yet through clever strip piecing it could easily be a weekend project.

image.jpeg

Lynne’s eye for colour has always made the quilts she makes special, and the ones in this book are no exception. Though it’s hard to pick a favourite, the cool, water-inspired fabric pull of the Out on the Ocean mini quilt makes my heart sing, as does the freehand curved piecing, something which I’ve experimented with myself a lot in the past. It was refreshing to see several improv pieced projects alongside Lynne’s more usual precisely-cut-out-projects.

Amongst the twenty modern projects featured, there really is something for everyone, regardless of ability or skill. Whilst tidying up the sewing room the other day, I couldn’t help but pull some fabric ready to make some Schoolhouse blocks. I’ve seen these beauties from Lynne before and the wall hanging in the book looks so awesome I think I need one of my own.

To get you all inspired for some quick and easy quilt making I have a copy of the book to give away to one luck reader. To be in with a chance of winning, simply leave a comment on this post telling me what type of quilter you are. Do you like long cutting lists and precision, or are you like me and love to hack, press and slash? The competition is open to all and I’ll draw a winner in a week. Good luck!

The giveaway is now closed and the winner has been notified.  Thanks to all who entered!

EASTER PAUSE…AND PLANNING.

Happy Easter everyone! I hope you’re all taking the time to slow down and surround yourself with the people and places that you love. We have a nice relaxing few weeks planned and are spending some time travelling around the country. With the sewing machine taking a well-deserved rest too, it’s the perfect time to take stock and plan for the coming months.

As well as the books and board games I’ve packed, I’ve brought along my trusty note pad. I intended to get organised and prioritise what I need to work on once the holiday is over.

First up will be to finish the wonky cross I’ve been working on for what seems like an age. It’s been one of those slow burning projects that I work on between more pressing deadlines. I think now the time has come for it to take a front seat and get finished. I intended to have it long armed, so I’ve only the top to concentrate on.

image

image

image

I do so enjoy working on this project, and I’ve been lucky enough to receive some great scraps from the IG quilting community. I was running out of my own in these colours and, knowing that I wanted this to be a large quilt, I put out a call to arms for any fabric people could spare. Boy, did they deliver. I have so many now and can’t wait to get them all pieced into blocks.

Now, where did I put that notebook?

THE DENIM STUDIO BY ART GALLERY FABRICS

Oh my goodness! I could sit here and list the reasons why I haven’t blogged in such a long time, but to be honest, I can’t even remember them all. I know there was the small matter of buying a house to deal with, Christmas, and lots of small deadlines that seemed to get the better of me. So, I say we forget all that and jump straight in with the loveliness that is the new denim collection by Art Gallery Fabrics.

image

Those of you who follow me on Instagram will now how excited I was when Christopher, aka The Tatooed Quilter, asked me to be part of a blog tour celebrating this new fabric release. From my experiences of sewing with AGF in the past, I knew that this was something I had to be involved in, not to mention these were denims designed for quilters! I was sold.

As I waited patiently like a fabric-crazed animal for my supplies to arrive, I got to thinking about what I would make with them once they had. The collection is made up of 25 different fabrics so there really is something for every project. I’d requested some of my favourite prints in the lightweight denim, some solids in the smooth denim and a few colours of heavier, textured denim. When I ordered them I wasn’t sure what they’d become, so I played it safe and got a bit of everything!

image.jpeg

At the drawing board, my mind recalled a story about the time my grandmother gave my dad some money to buy a new pair of jeans. As a boy, I was told the cautionary tale so many times I’ll never forget it!

With three children to raise and my grandfather long-passed, money was tight, so my dad was overjoyed at the thought of a new pair of jeans. With the money in his vice-like grip, he went to the big city to seek out them out. Once there, he became enamoured with a pair of patchwork jeans, made up of oddments of denim and detailed with crazy stitching. It wasn’t too long before the money in his hand had been replaced with a bag in which a pair of the mismatch jeans was tucked. Upon returning home, my dad couldn’t wait to show my grandmother what he’d bought. He was sure to be the talk of the town with these new threads! How pleased she would be to have such a popular son!

My grandmother did not agree. So mortified was she that my dad had spent the money on what she saw as rags, she took what little change there was, clipped him around the ear and caught the next bus to Cardiff to return them!

image

The mini quilt I made pays homage to this story. I used a variation of my tried and tested ‘Drunked Tiles’ quilt to piece small, oddly-shaped pieces of denim together, blending both the prints and solids to create my own mismatch of denims. I added some improv diamonds throughout the top, starting densely in the top left corner and becoming less frequent as you move across the quilt. I fell in love with the rich ochre of the textured denim but was worried about the seams it would create, particularly in the blocks where it meets at four places. Whilst they were thicker than usual, I pressed them open and decided upon a dense quilting pattern to take care of the rest.

image

The quilting was a joy to do and was another favourite, an edge-to-edge sea of mussel shells, quite dense so as to secure all those seams. The mini lies beautifully flat.

image

I don’t think I’ll ever be a quilter who likes a lot of unquilted space. I say, the denser the better! The Aurfil 50 weight blends beautifully into the denim and yet adds just the right amount of visual interest.

The fabric was a dream to sew with. It presses beautifully and is so soft. I can see this become a stash-staple, particularly the solids, and can imagine lots of lovely fabric pulls that combine it with other AGF collections. For me, the rich colours evoked a western theme; cowboys and cacti, dusty plains and low suns.

image

I can’t wait to hang this on a wall in the new place. I think it’ll look perfect in the dining room, where the cacti live.

Thank you for sticking with me during my leave of absence! To any new followers I may have acquired since my last post, I can assure you, the wait isn’t usually this long!

Be sure to check out all the other stops on the blog tour, as well as the hashtag #thedenimstudiobyagf on Instagram, and do your stash a favour, get some AGF denim in it!

Monday 14th – The Tatooed Quilter

Tuesday 15th – Me

Wednesday 16th – Sariditty

Thurday 17th – Ginger Peach Studios

Friday 18th – Modernhandcraft